

This tutorial demonstrates my method for preparing a scanned pencil drawing for digital colouring in Corel PaintShop Photo Pro (X3). It shows how you can convert your drawing into a purely black-and-white outline that can be filled with colour, as well as how to set up your image for separate background and subject layers, and also how you can preserve your original pencil outline in your final picture.
The example image used to illustrate this tutorial is Tembe - Summoned By The Chief.
Tutorial written: 07/07/2011
First of all, you need to scan your pencil drawing. There are several things to be sure of before you do:
- Ideally, it is much more convenient for colouring if you don't draw the subject and the background on the same piece of paper. This is because it will be easier to colour them separately as different layers within your graphics program. (I actually don't tend to draw backgrounds on paper anyway - I simply draw them later into the digital image using a tablet.)
- Try and keep the linework as clean as possible, otherwise you may be left with marks that you don't want on your final picture. If your drawing is covered with smudges or faint sketching lines, you might want to try tracing the image onto a fresh sheet of paper.
- Blow off any stray pieces of rubber, pencil lead etc. so that the paper is clean.
- Make sure there isn't anything on the reverse side of your page as this may show through when scanning. Erase it beforehand if necessary.
Generally, I find it is best to scan at around 300dpi. Anything lower compromises the quality of the image and anything larger can be rather cumbersome to work with.
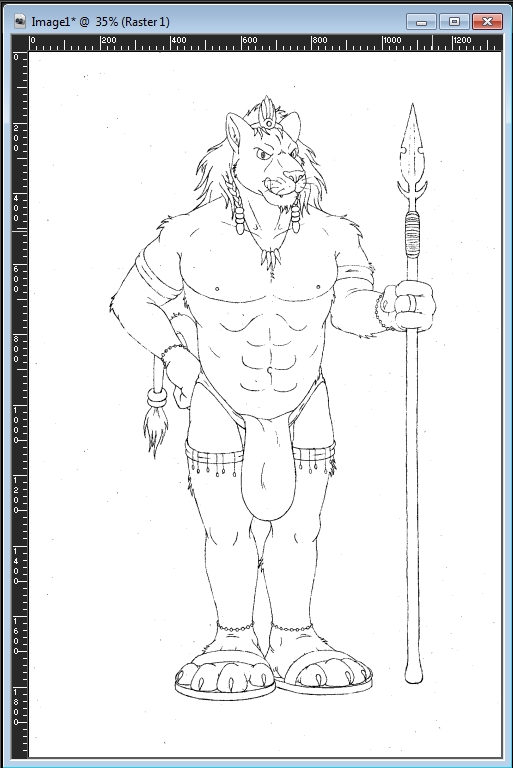
Once scanned, your image should hopefully look something like this:
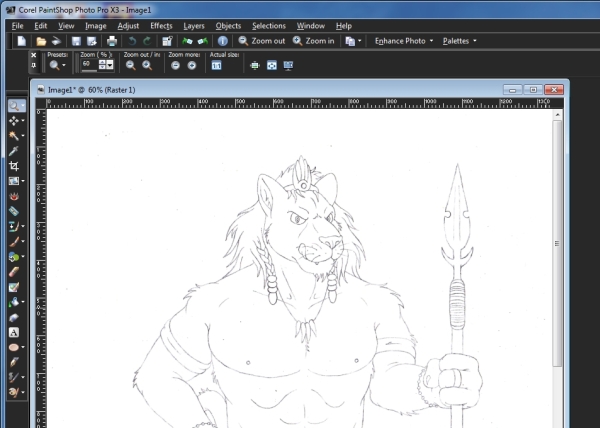
Once you've got your scanned picture, save two copies of it - one will be edited and used for colouring, whilst the other is to be kept for a later stage.
One of the classic dilemmas that one faces when uploading a pencil drawing is how exactly to convert the picture into a purely black outline on a white background so that it can be quickly filled with colour.
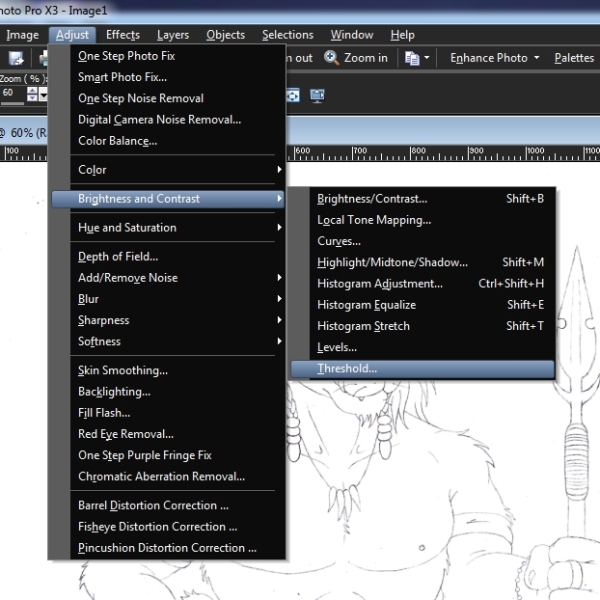
There are many ways of doing this, but the method I use involves a tool called 'Threshold'. This tool changes your image into a simple two-tone, black-and-white image by turning dark shades into pure black and light shades into pure white.
The Threshold tool can be found in the 'Adjust' menu within 'Brightness/Contrast':
This will bring up the Threshold window. If you enable 'Preview on Image' at the top, you will notice that the Threshold tool changes your scanned image into a purely black and white picture:
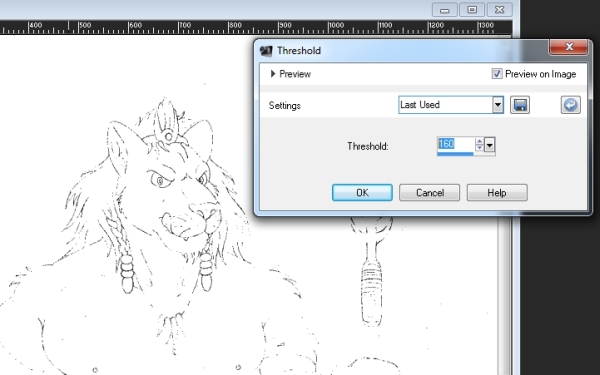
You may find your picture looks faded or seems to disappear completely - don't panic! This just means you will need to play with the Threshold level.
As we can see, the outline above looks rather faint and speckly. This is because the program is turning much of the outline into white instead of black.
So we need to raise the Threshold level. This alters which shades of grey the program will turn into black. A low number tells the program to only change the very darkest greys into black and convert everything else to white, while a high number tells the program to change even very light greys to black.
Therefore, if we choose a higher number, more greys will be converted to black and restore the missing sections of our outline. The result is a much bolder and more solid outline:
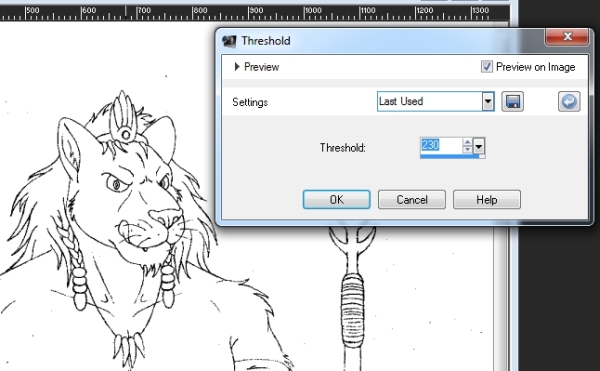
Tweak with the level and see what gives you the best quality outline. I often find something between 230 and 240 works well on my pictures, but simply use trial and error until you get an outline you are happy with. You may sometimes find that you need to select portions of the picture and use different Threshold levels on each one.
You should then end up with a simple two-tone, black and white image like this:
(It is a good idea to save your image before moving on to the next step. If you wish, you can save as a backup under a new filename.)
The Threshold tool works quite well in cleaning up your drawing to produce a nice simple black-and-white outline. But it doesn't work perfectly. Here are several problems that you may face:

- Gaps in outline - it's almost inevitable that you will find some gaps in your outline after using the Threshold tool. Obviously if you are going to use the paint bucket/flood fill tool to colour (as I do), you'll need to fill these gaps manually, usually with a black paintbrush tool. If you've got really big gaps or lots of gaps however, you might want to undo your Threshold step and try re-applying it a higher level.
- Black speckles - using the Threshold tool will clear most of the blank areas to pure white, but you can often end up with little speckles of black that aren't part of the outline. You can remove these manually using a white paintbrush, but there is a step later on in this tutorial which will pretty much solve this problem for you automatically.
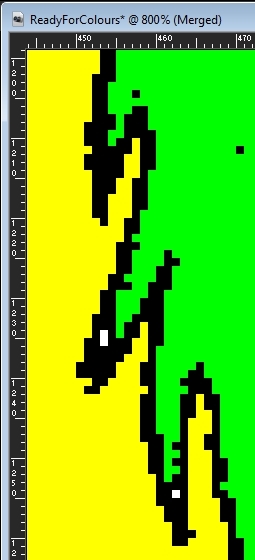
- White speckles inside black outlines - ultimately, if you're not going to ink your lines digitally, it's always likely that you'll get some areas where the pencil outline has not been converted properly into a solid black line, with little speckles of white dotted inside the outline.
Once you have filled in the gaps in your outline, you need to address the white speckles inside the outline. You can of course get rid of them manually using a black paintbrush, but I have found another way to deal with them. Essentially, the idea is to colour in all the blank areas of your picture so that the only white left in the image is the speckles that you want to remove.
You can begin to colour your image now - provided you don't use any pure black/white - but I tend to leave this till later when the outline has been tidied up. For now, choose any random colour - anything except pure black or pure white - and start filling in the areas of your picture as if you were colouring it in:
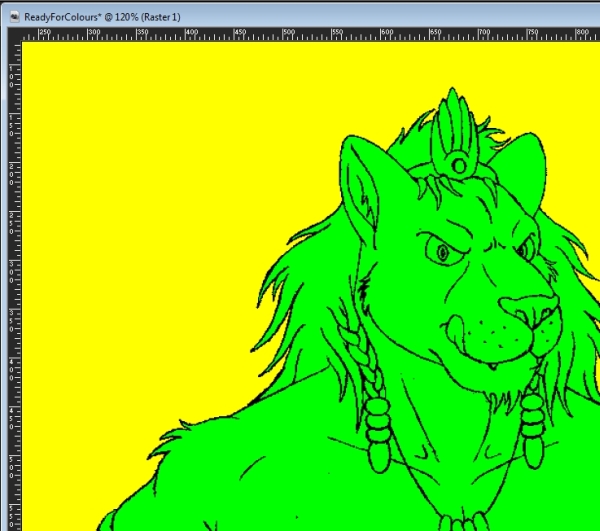
You'll notice that I use two random colours - one for the actual subject, and one for the background/empty space. There is a reason for this which I will come to later.
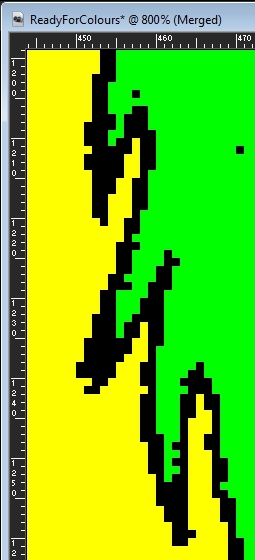
Eventually, when you have filled the picture with your random colours, the only white left will be the speckles within the outline:
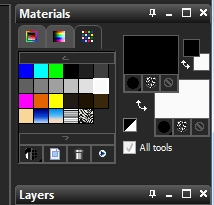
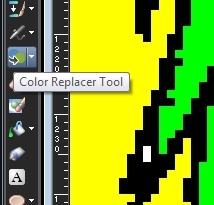
What you now need to do is replace all these white speckles with black. To do this, go to the Materials window (shown near right), left-click on pure black (R0, G0, B0) and right-click on pure white (R255, G255, B255).
Then select the Colour Replacement tool (shown far right). The Colour Replacement tool works by swapping the right-click colour with the left-click colour if you press the left mouse button, or swapping the left-click colour with the right-click colour if you press the right mouse button. If you double click either button, the program will swap all pixels of one colour for the other.
Now simply double-click the left mouse button on the picture, and all of the white speckles will instantly be replaced with black (if they do not, check you have selected the correct RGB colour levels as detailed above):
Now you have eradicated all of those annoying white speckles, you can get rid of the random colours - either by filling them in white with the paint bucket, or by using the Colour Replacement tool again:
Again, you will notice that the background in my picture is a slightly different colour to the actual subject. The next step will explain why.
(It is a good idea to save your image before moving on to the next step. If you wish, you can save as a backup under a new filename.)
As mentioned earlier, ideally you want the subject of your picture and the background to be on separate layers so that they are easier to edit and colour. Of course, this means you will need to remove the blank white areas surrounding your subject so that the background will show through from behind.
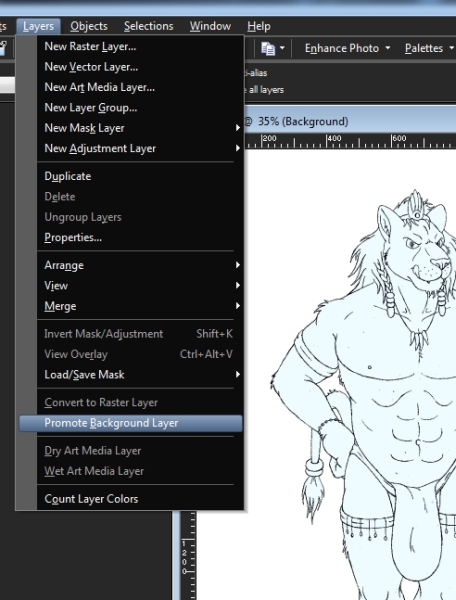
Firstly, you need to check that your picture is not on a Background Layer, otherwise you can't make it transparent. To do this, open the Layers menu and check if the option to 'Promote Background Layer' is available - and if it is, select it. (If it is not available, it means your picture is not on a Background Layer, so you don't need to do anything.):
Next, you need to remove all of the blank white areas - i.e. anything that is not part of the subject, or anywhere that you want the background to show through. To do this, select the Magic Wand tool. Make sure that 'Tolerance' is set to 0 in the tool options and click on the black white area surrounding your subject (If part or all of your subject is selected as well as the pure white areas, check you have set the Tolerance correctly.):

If your picture is quite complicated, there may be lots of blank white areas like this. You can of course simply hold down Shift and click each area manually to select them together, but there is a quicker way.
This is where it becomes useful to have used two different colours for the subject and the background during Step 3. If you have used different colours, you can simply go to the Selections menu and click 'Modify > Select Similar':
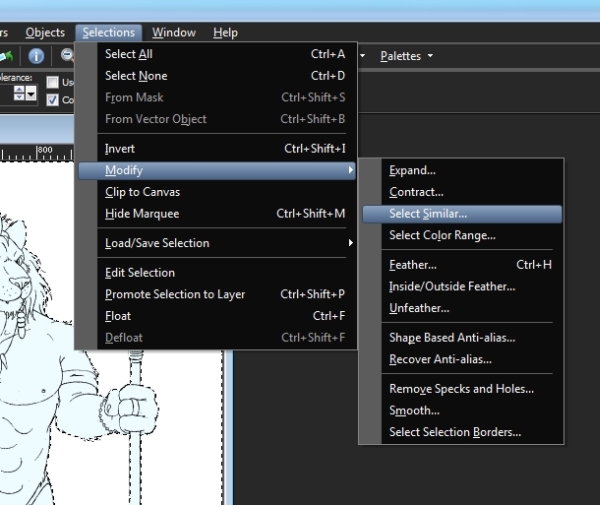
In the resulting window, make sure that Tolerance is set to 0, Anti-Alias is unchecked and Discontiguous is selected:
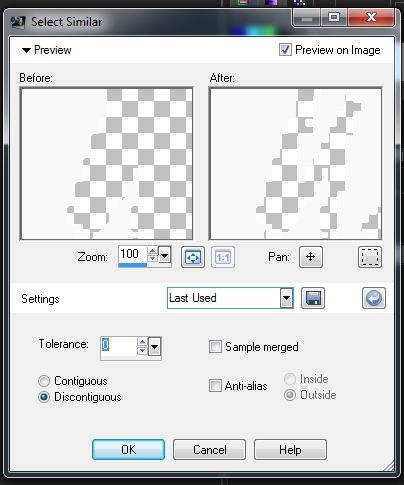
Click OK and the program should now automatically select all the blank white areas that aren't part of your subject. (If it does not, check the Tolerance, Anti-Alias and Discontiguous settings are set correctly as described above.):
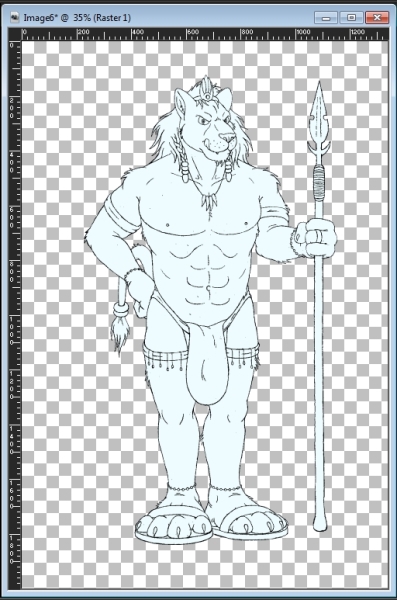
Now you can simply press Delete and all the blank white areas will be cleared to form transparent zones, leaving only your subject floating on the layer:
(It is a good idea to save your image before moving on to the next step. If you wish, you can save as a backup under a new filename.)
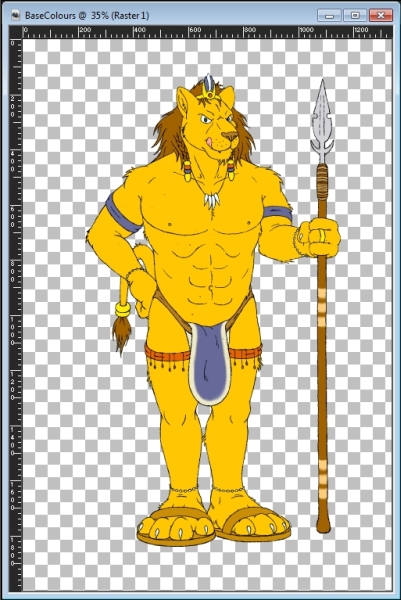
Your picture is now ready to be coloured with whatever colours you choose. There are various methods for doing this, but I have always simply used the Paint Bucket tool to click and fill the areas:
Of course, you can continue from this point with shading, backgrounds etc. - however, there is one final stage of this tutorial which can both improve the quality of your outline and remove those irritating black speckles mentioned in Step 3.
(It is a good idea to save your image before moving on to the next step. If you wish, you can save as a backup under a new filename.)
Given that I like to draw my pictures neatly in pencil, it seems a shame that you have to turn your linework into a rugged, bold, black outline simply to be able to fill it with colours. However, there is a way to restore your original pencil outline on your digitally-coloured picture.
Firstly, load up the second copy of the original outline which you saved in Step 1:
On the original outline image, press Ctrl+A to select the whole picture. Then, switch to your coloured version and press Ctrl+L to paste the pencil outline on top as a new layer. This will temporarily make it look like your picture has gone back to how it started, but fear not!
(If you find the outline layer does not paste in line with the coloured layer, check that the images have the same dimensions.)
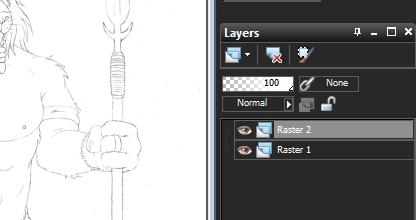
Now in the Layers window, you should see two layers - one on the bottom which is your coloured picture (in this case 'Raster 1'), and one on the top which is your pencil outline (in this case 'Raster 2'. You may wish to rename both of these later.):
The next step is the crucial part. With the top layer (i.e. 'Raster 2', or your pencil outline) selected, go to the Blend Options - found at the top of the Layers window where it says 'Normal' - and click it to open up the dropdown menu.
In this menu, you should see an option that says 'Multiply':
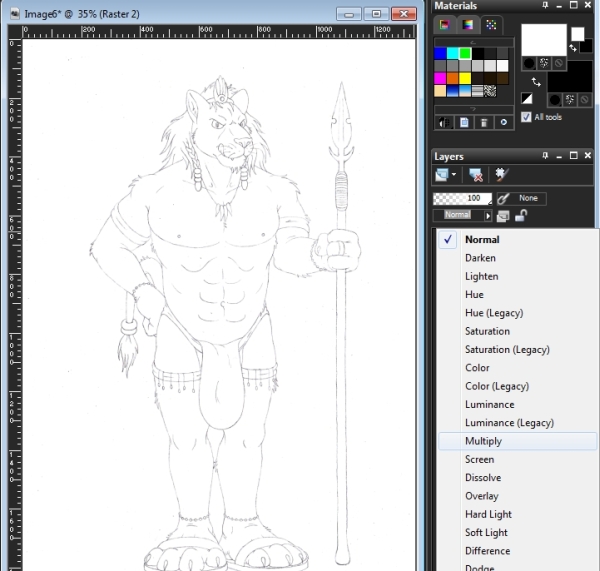
Click 'Multiply' and you should find your coloured picture suddenly becomes visible again, only the chequered pattern behind it has been replaced with white:
Basically, what you have just done is told the program to lay your pencil outline over the top of your coloured picture without showing the blank white of the paper.
All you need to do now is get rid of the chunky black outline you created to colour the picture. The Colour Replacement tool can be useful here, but the quickest way I have found to do this is using blurring.
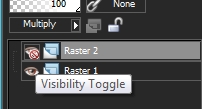
First, just to keep things simple, click the 'Visibility Toggle' button (shown right) for the top layer (i.e. 'Raster 2', or your pencil outline) to turn it off, meaning you can only see the bottom layer.
Switch to the bottom layer (i.e. 'Raster 1', or your coloured layer) by clicking it in the Layers window.
Now click the Magic Wand tool - again making sure that Tolerance is set to 0 in the tool options - and click on any part of your black outline. Once you've done that, go to 'Modify > Select Similar' in the Selections menu as explained in Step 4.
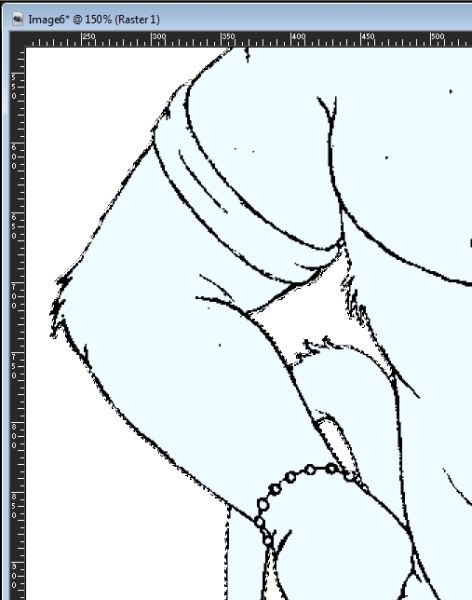
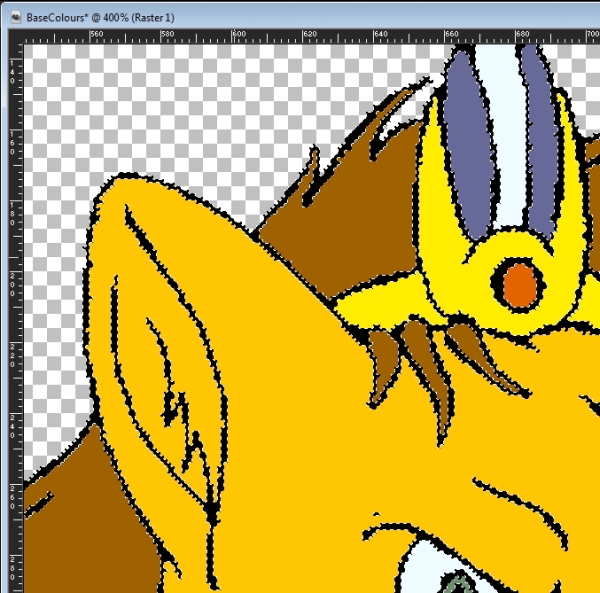
Upon clicking OK, you should find that the program automatically selects every part of your black outline - and all those annoying black speckles too:
Now click the 'Visibility Toggle' button for the top layer (i.e. 'Raster 2') to turn it back on again. Don't click the layer name itself; just the 'eye' button. (If you do click the layer name by accident, make sure you click the bottom layer name (i.e. 'Raster 1') before moving on.)
Next, open the Adjust menu, find 'Blur', and select 'Gaussian Blur':
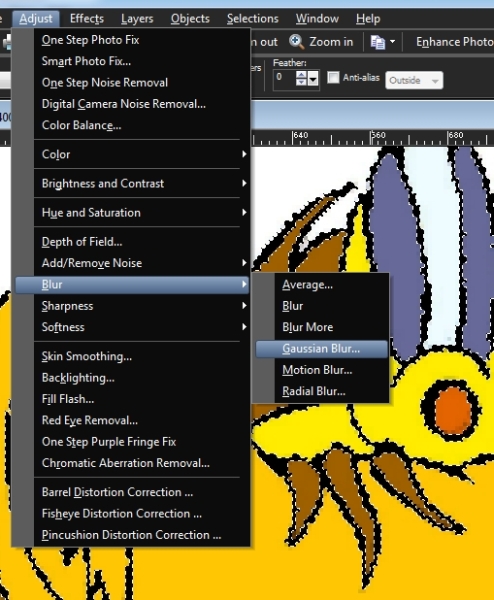
In the Gaussian Blur window that comes up, enter a blur radius value (I find something between 4.00 and 5.00 is usually sufficient) and make sure that 'Preview on Image' is enabled. You should see that the black outline is altered:
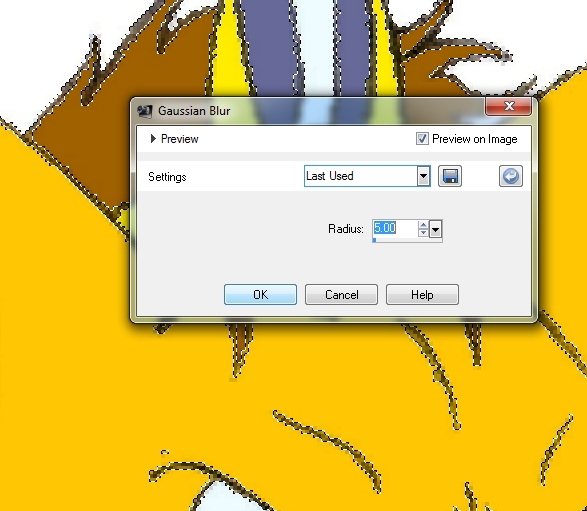
When you're happy with what you see, click the OK button to apply the blur.
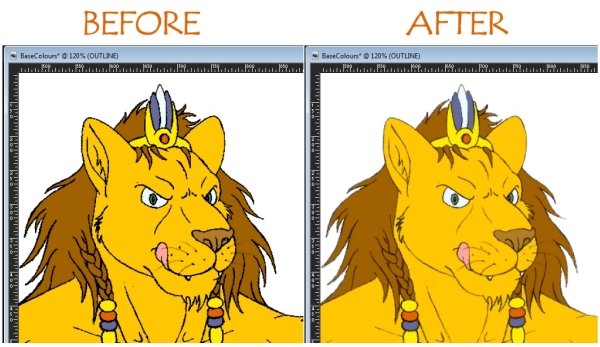
What you are actually doing is blurring the black into all the colours surrounding your outline. This therefore makes the outline blend much more seamlessly into the coloured picture. It also blurs out those black speckles, so you shouldn't have to worry about them anymore.
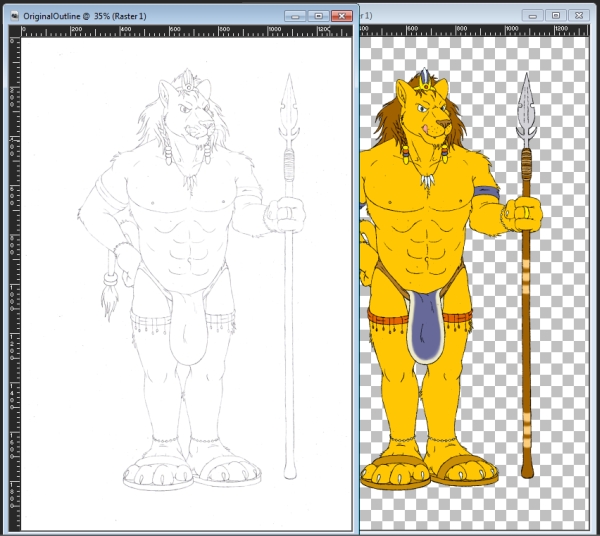
When comparing the two side-by-side, you can see how much softer and more natural the pencil outline looks compared with the black outline:
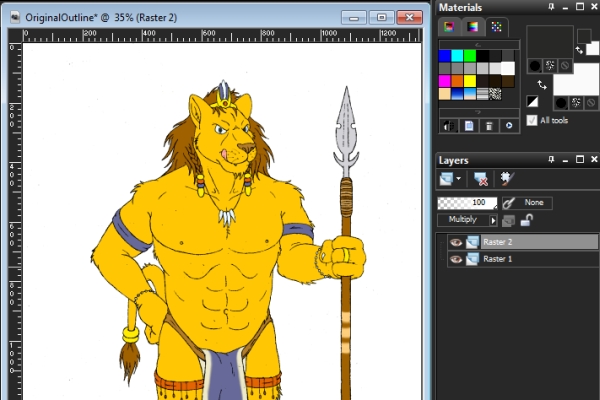
So there you have it - your picture has now been coloured and your linework has been tidied up. Hopefully, having followed all of the steps in this tutorial, your image should now look something like this:
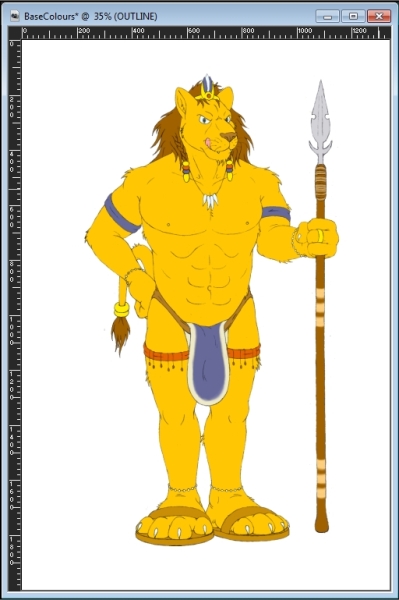
From this point, you can begin to add shading and background layers as well as any other details you wish to add. (Check the Tutorials page for tutorials on shading and backgrounds in due course.)
If you have any queries about any aspect of this process or require further advice, feel free to get in touch with me using the links on my Contact page.
RRRex
Back to top